Componentize the web with Polycasts!

Today at Google, we’re excited to announce the launch of Polycasts, a new video series to get developers up and running with Polymer and Web Components.

Web Components usher in a new era of web development, allowing developers to create encapsulated, interoperable elements that extend HTML itself. Built atop these new standards, Polymer makes it easier and faster to build Web Components, while also adding polyfill support so they work across all modern browsers.

Because Polymer and Web Components are such big changes for the platform, there’s a lot to learn, and it can be easy to get lost in the complexity. For that reason, we created Polycasts.

Polycasts are designed to be bite sized, and to teach one concept at a time. Along the way we plan to highlight best practices for not only working with Polymer, but also using the DevTools to make sure your code is performant.

We’ll be releasing new videos often over the coming weeks, initially focusing on core elements and layout. These episodes will also be embedded throughout the Polymer site, helping to augment the existing documentation. Because there’s so much to cover in the Polymer universe, we want to hear from you! What would you like to see? Feel free to shoot a tweet to @rob_dodson, if you have an idea for a show, and be sure to subscribe to our YouTube channel so you’re notified when new episodes are released.

Posted by Rob Dodson, Developer Advocate
Read More..

Meetings made simple with guest access


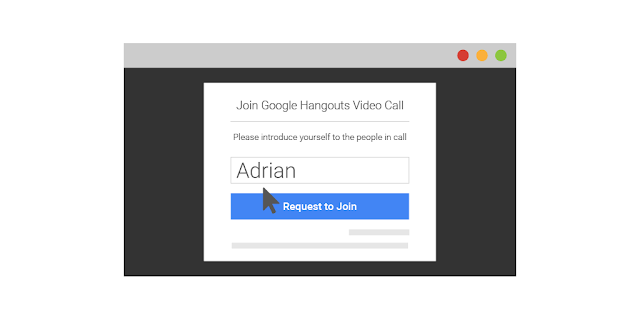
Joining a meeting should be as easy as walking into a room. That should be the case whether you’re meeting in person, or face-to-face over video. This week we’re rolling out an update to Google Hangouts that makes joining a video call as simple as clicking a link in an invitation. No filling in forms, no need for a Google account, just simple, easy access to meetings. Connect with teammates and get things done, while maintaining the control and security you need in a work environment.
Say you’re a business about to talk through new product plans with your supplier, and you decide it’d be great to also get the thoughts of a key customer. No problem.

  1. Invite your external guests with Google Calendar
  2. They click a link in the event description and fill in their name
  3. In order to help give you control and security over your meetings, you’ll get a prompt to accept / deny their entry whether you’re using web, mobile or Chromebox for meetings.

With Hangouts security features like locking video meetings to only people within an organization and muting and ejecting participants, there’s always the right level of security to match your organization’s needs.

Learn more about Hangouts today.
Read More..

Connect Windows 10 to HC 06 Bluetooth

This post show how to connect Windows 10 to HC-06 Bluetooth Module.


Actually its a loopback connection:
PuTTY Serial connect to Bluetooth Outgoing port -> (Bluetooth) -> HC-06 -> FT232RL -> (USB) -> Arduino IDE Serial Monitot.


This video show how to pair HC-06 on Windows 10, and try the loopback test.


Related:
- Raspberry Pi Bluetooth Serial Terminal, using HC-06 Bluetooth Module, connect from Windows 10 with Bluetooth, using PuTTY.

Read More..

Linear layout

Linear layout is like a box that contains controls inside it. Controls are drawn one after each other either horizontally or vertically according to the Orientation of the layout.


When dealing with Linear layout there are five properties that we can deal with:
  1. Oientation.
  2. Fill model.
  3. Weight
  4. Gravity.
  5. padding.
Orientaition:
Orientation property determines whether the controls would be put in a horizontal way like in a row or in a vertical way like a column. The layout orientation is set by the property android:orientation


Vertical orientation:


<button
android:layout_height="wrap_content"
android:layout_width="fill_parent"
android:text="this is a button 1"
/>

<Button
android_layout_width="fill_parent"
android_layout_height="wrap_content"
android_text="this is a button 2"

/>


Horizontal Orientation


<Button
android_layout_width="fill_parent"
android_layout_height="wrap_content"
android_text="this is a button 1"

/>
<Button
android_layout_width="fill_parent"
android_layout_height="wrap_content"
android_text="this is a button 2"

/>


If you want to set the orientation programmatically you can use this code
android.widget.LinearLayout mainLayout=new LinearLayout(this);
mainLayout.setOrientation(LinearLayout.VERTICAL);
Fill Model:
The widgets inside linear layout have width and height properties. These properties can have three values:
  1. A numeric value in pixels or inches that gives the width or height properties an absolute value. 
  2. They can have the value wrap_content meaning the widget should occupy it’s natural size unless there is no space then android can use word wrap to make the widget fit.
  3. They can have the value fill_parent meaning the widget should occupy all the available space of the closing container.
To set the fill model programmitaclly use this code:
Button b=(Button)findViewById(R.id.btn);
b.setWidth(LayoutParams.WRAP_CONTENT);
b.setHeight(LayoutParams.FILL_PARENT);
This is an example to two buttons one with width set to fill_parent and the other set to wrap_content
Weight:
The weight property determines the ratio by which controls share free space. For example if we have two buttons and the weight of both is set to 1 (this is the default value) then the free space will be divided equally between them.
But if the value of the weight of one of them is 2 and the other is one, then the first button will occupy space half as that occupied by the second and so on.


<button
android:layout_height="fill_parent"
android:layout_weight="1"
android:layout_width="fill_parent"
android:text="weight set to 2"
/>
<button
android:id="@+id/btn"
android:layout_height="fill_parent"
android:layout_weight="1"
android:layout_width="fill_parent"
android:text="weight set to 1"
/>


To set the weight of a widget programmatically it’s a little bit different, we use this code:
Button b=(Button)findViewById(R.id.btn);
LayoutParams params=new android.widget.LinearLayout.LayoutParams(android.widget.LinearLayout.LayoutParams.FILL_PARENT,android.widget.LinearLayout.LayoutParams.FILL_PARENT,3);
b.setLayoutParams(params);

the widget does not have a method to set the weight directly, instead you define
LayoutParams params=new android.widget.LinearLayout.LayoutParams 
object and use the widget. setLayoutParams(params) method.
The LayoutParams class has many constructors including this one
public LinearLayout.LayoutParams (int width, int height, float weight)
Gravity:
By default widget are positioned in the top-left of the screen, but if you want to change this you can use the layout_gravity property


<button
android:layout_gravity="left"
android:layout_height="wrap_content"
android:layout_width="wrap_content"
android:text="left">
/<button
android:layout_gravity="center"
android:layout_height="wrap_content"
android:layout_width="wrap_content"
android:text="center"
/>
<button
android:layout_gravity="center_vertical" android_layout_height="wrap_content"
android:layout_width="wrap_content"
android:text="center_vertical"
/>
<button
android:layout_gravity="center_horizontal" android_layout_height="wrap_content"
android:layout_width="wrap_content"
android:text="center_horizontal"
/>
<button
android:layout_gravity="right"
android:layout_height="wrap_content"
android:layout_width="wrap_content"
android:text="right"
/>

<button
android:layout_gravity="bottom"
android:layout_height="wrap_content"
android:layout_width="wrap_content"
android:text="bottom"
/>


Or something like this


<button
android:layout_gravity="fill_vertical" android_layout_height="wrap_content"
android:layout_width="wrap_content"
android:text="fill_vertical"
/>
<button
android:layout_gravity="fill_horizontal" android_layout_height="wrap_content"
android:layout_width="wrap_content"
android:text="fill_horizontal"
/>
<button
android:gravity="right"
android:layout_gravity="clip_horizontal" android_layout_height="wrap_content"
android:layout_width="wrap_content"
android:text="clip_horizontal"
/>
<button
android:gravity="top"
android:layout_gravity="clip_vertical" android_layout_height="wrap_content"
android:layout_width="wrap_content"
android:text="clip_vertical"
/>


Notice that values clip_horizontal and clip_vertical are clear if only the android:gravity property is defined. If this property is not defined then the control will be clipped on both edges.

When using android:layout_gravity="clip_horizontal" with android:gravity="right" the control’s left edge will be clipped and if the android:gravity="left" the right edge will be clipped.

When using android:layout_gravity="clip_vertical" with android:gravity="top" the control’s bottom edge will be clipped and if the android:gravity="bottom" the top edge will be clipped.

So what is the difference between the android:layout_gravity and the android:gravity properties:

The android:layout_gravity sets the position of the view in the container, while android:gravity sets the position of the content of the view.


For example if the android:layout_gravity=”right” then the view would be placed in the right position in the container while if the view’s android:gravity=”right” then the text of the view would be placed at the right.


To set the android:gravity property programmatically you can use this code:

Button btn=(Button)findViewById(R.id.btn);
btn.setGravity(Gravity.RIGHT);

Padding:

The android:padding property sets the padding between widgets. if you specify the padding property to the container then the container with all of its widgets would be shifted by the value, if you specify it to a single widget then the contents of that widget would be shifted by the specified value.

If you use the android:padding property then this would apply the padding values to the four edges of the widget. If you need to be more specific you can use :
android:paddingTop or android:paddingLeft or android:paddingRight or android:paddingBottom


<button
android:layout_height="wrap_content"
android:layout_width="wrap_content"
android:text="button 1"
/>
<button
android:id="@+id/btn"
android:layout_height="wrap_content"
android:layout_width="wrap_content"
android:paddingleft="40px"
android:text="button 2"
/>


Read More..

Display ABI using adb shell getprop ro product cpu abi command


Different Android handsets use different CPUs, which in turn support different instruction sets. Each combination of CPU and instruction sets has its own Application Binary Interface, or ABI. The ABI defines, with great precision, how an applications machine code is supposed to interact with the system at runtime.

~ reference: http://developer.android.com/ndk/guides/abis.html


To identify the android device is 32-bit or 64-bit 

Android is going to support 64-bit, but there are so many android devices, how do developer know current device is 32-bit  or 64-bit  ?

Lets begin from  this command:

adb shell getprop ro.product.cpu.abi

getprop is an android utility to retrieve a property via the android property service.

~ referene: https://software.intel.com/en-us/blogs/2014/12/16/how-to-identify-the-image-is-32-bit-or-64-bit-user-space


This video show how the command "adb shell getprop ro.product.cpu.abi" run on device and emulator.


Related:
- List supported ABIs programmatically

Read More..

Get your students on the same web page instantly

Posted by Catherine Davis, former 4th grade teacher and Director of Academic Technology at Pilgrim School

(Cross-posted on the Google for Education Blog.)


Editors note: Today we’re launching a new Chrome extension, Share to Classroom, which solves a big pain point for teachers: getting all students to the same website during class. The Share to Classroom extension works on any laptop, including Chromebooks, Macs and PCs. Catherine Davis, former 4th grade teacher and Director of Academic Technology at Pilgrim School, piloted the Classroom extension with Mrs. Shorkey’s 3rd grade class, and here she describes her experience using this new extension and the impact on her students.


Sharing a website with my students is a great way to get them engaged. When we studied South America, I shared a video of Tierra del Fuego, and my students were able to view the coast, hear the wind and see the waves soar. But getting a class full of 4th graders on the same web page is a huge challenge. I typically write the URL on the board, then walk around to help each student who misses a capital or underscore or backslash. My students get frustrated, I get frustrated, and before I know it 10 minutes of precious teaching time is lost.

So I was thrilled to pilot the Share to Classroom extension. With the extension I can open a website and “push” it to my Google Classroom students, so the page opens immediately on all their devices. Our 3rd graders gasped when we tried it – the webpage instantaneously popped up on all of their screens.
The new extension lets me engage my students and help them drive their own learning on 1:1 devices at our school. When our 3rd graders were studying Native American culture, I pushed a website to the class so they could research traditional clothing and food. The students aren’t locked to the page I send, and one student navigated from there to an even better site. With the Classroom extension, the student was able to push the new site to me, and I reviewed and pushed to the entire class. She had a boost of confidence when her discovery drove class discussion.
Using the extension also lets me think on my feet. When discussing pioneers, a brave student raised his hand and asked “What’s a stage coach?” I realized my students hadn’t been exposed to the term. I immediately pulled up a definition and video and pushed it to the class. I also saved the webpage as a draft to post to my other Classroom students later. I could have projected on a screen, but the intimacy of having the webpage on each device allows students to explore on their own, hear clearly and watch repeatedly. It also levels the playing field for ELL and students of different backgrounds so everyone starts literally on the same page.

As teachers, we never feel we have enough time to do everything we want with our students. The new Share to Classroom extension gives us back those few minutes it takes to get students to the same place and makes learning about investigating, not about navigating.

*Note: Google Apps admins can install the extension for their entire domain so that it’s easiest for teachers and students to get started. Teachers and students both need the extension in order to push web pages to each other.
Read More..

More details about incoming Sense 5 5 update

The dust hasnt settled yet after the first worldwide HTC Sense 5.5 screenshots and here comes the another part of the fresh new details about newest HTC Sense UI. Have fun!


Lock-screen widgets - possibility to place one widget on the lock-screen. You need to swipe left to see the additional screen, where you can place of one these widgets: Gmail, Google+, Calendar, Google Keep (x2), Calculator, Music, Google Now and some widgets from 3rd party applications with support for lock-screen widgets, like Minimalistic Text or SoundHound


Possibility to use entire UI in landscape mode when device is inside car dock. Home screen, phone panel and basically everything else is working very well in landscape mode.


Possibility to use "Automatic brightness" and "Maximum brightness level" at the same time. This allows you to save some battery, because brightness max level can be limited. 


Possibility to edit "Phone" panel. You can rearrange them or even remove unused tabs. This is rather small, but very nice improvement. You dont need to swipe 3 or 4 times any more to access particular tab.


New BlinkFeed settings panel, where you can select the exact content you want to view on your BlinkFeed screen. It seems that HTC really focused on their BlinkFeed child. Lets hope it will still be getting better and better!


Possibility to protect SMS backup with password. I believe that every "security" or "privacy" related update is important, even if most users wont probably use it.


"Stay awake" is finally back in Developer options in Settings. Taken away few months ago and desperately desired by users and developers.


Up to 6 (previously 5) home-screen panels including BlinkFeed screen. In my personal opinion 6 is weird number because this little thin line, also known as screen indicator can never be in the centre. This can be little confusing when using the device.


"Do not disturb" mode accessible via Quick Settings panel. Really great feature if you dont want to be waken up few times during the night!

More details coming soon!

Have any questions or comments? Feel free to share! Also, if you like this article, please use media sharing buttons (Twitter, G+, Facebook) below this post!
Read More..

Polymer Summit Schedule Released!

Posted by Taylor Savage, Product Manager

We’re excited to announce that the full speaker list and talk schedule has been released for the first ever Polymer Summit! Find the latest details on our newly launched site here. Look forward to talks about topics like building full apps with Polymer, Polymer and ES6, adaptive UI with Material Design, and performance patterns in Polymer.

The Polymer Summit will start on Monday, September 14th with an evening of Code Labs, followed by a full day of talks on Tuesday, September 15th. All of this will be happening at the Muziekgebouw aan ‘t IJ, right on the IJ river in downtown Amsterdam. All tickets to the summit were claimed on the first day, but you can sign up for the waitlist to be notified, should any more tickets become available.

Can’t make it to the summit? Sign up here if you’d like to receive updates on the livestream and tune in live on September 15th on polymer-project.org/summit. We’ll also be publishing all of the talks as videos on the Google Developers YouTube Channel.

Read More..

InspireGirls with us


We all have women in our lives that inspire us. Our mothers, daughters and sisters. Our friends, coaches and teachers. Our favorite soccer players, computer programmers and thought leaders.

These women teach us how to code, how to shoot three pointers under pressure, how to deliver a flawless speech to a packed auditorium (imagining them in their underwear doesn’t work for everyone). There’s one thing they all have in common: they help us be more confident. And because confidence helps us turn our ideas into action, it’s an essential quality in helping us succeed.
However, in a recent study, half of female respondents reported self-doubt about their job performance and careers, compared with fewer than a third of male respondents. The root of this gap starts early: between elementary school and high school, girls’ self-esteem drops 3.5 times more than boys’.

Research shows that in order to close this confidence gap, girls need to see other successful women who do what they love. Whether it’s starting a business, joining the Army, being a construction foreman, playing sports in college or raising a family, having these role models and receiving encouragement from them assures girls that they can chase — and catch — their dreams. No matter how tough that might be, no matter what kind of obstacles get in the way.
That’s why this year, in honor of International Women’s Day and Women’s History Month, we want to inspire the next generation of female leaders to dream, hack, hustle and create. We want to think about the future Sandra Day O’Connors, Oprah Winfreys, Edith Clarkes and Amelia Earharts. Eighty years from now, who will we celebrate during Women’s History Month? Who will we applaud and commemorate for changing the way we look at science, technology, business and education? They could they be our granddaughters, nieces, mentees. Let’s inspire them now. We invite you to join the conversation and share your own stories on Twitter and Google+ using #InspireGirls.


Read More..

Retrieve IP and MAC addresses from proc net arp

Last post "Display WiFi Hotspot clients by "cat /proc/net/arp"" display arp as human readable string, but not machine readable. Its another version to retrieve IP and MAC addresses, store in a ArrayList.


MainActivity.java
package com.blogspot.android_er.androidlistclient;

import android.os.Bundle;
import android.support.v7.app.AppCompatActivity;
import android.view.View;
import android.widget.Button;
import android.widget.TextView;

import java.io.BufferedReader;
import java.io.FileNotFoundException;
import java.io.FileReader;
import java.io.IOException;
import java.util.ArrayList;

public class MainActivity extends AppCompatActivity {

Button btnRead;
TextView textResult;

ArrayList<Node> listNote;

@Override
protected void onCreate(Bundle savedInstanceState) {
super.onCreate(savedInstanceState);
setContentView(R.layout.activity_main);
btnRead = (Button)findViewById(R.id.readclient);
textResult = (TextView)findViewById(R.id.result);

listNote = new ArrayList<>();

btnRead.setOnClickListener(new View.OnClickListener() {
@Override
public void onClick(View v) {
readAddresses();
textResult.setText("");
for(int i=0; i<listNote.size(); i++){
textResult.append(i + " ");
textResult.append(listNote.get(i).toString());
textResult.append(" ");
}
}
});
}

private void readAddresses() {
listNote.clear();
BufferedReader bufferedReader = null;

try {
bufferedReader = new BufferedReader(new FileReader("/proc/net/arp"));

String line;
while ((line = bufferedReader.readLine()) != null) {
String[] splitted = line.split(" +");
if (splitted != null && splitted.length >= 4) {
String ip = splitted[0];
String mac = splitted[3];
if (mac.matches("..:..:..:..:..:..")) {
Node thisNode = new Node(ip, mac);
listNote.add(thisNode);
}
}
}

} catch (FileNotFoundException e) {
e.printStackTrace();
} catch (IOException e) {
e.printStackTrace();
} finally{
try {
bufferedReader.close();
} catch (IOException e) {
e.printStackTrace();
}
}
}

class Node {
String ip;
String mac;

Node(String ip, String mac){
this.ip = ip;
this.mac = mac;
}

@Override
public String toString() {
return ip + " " + mac;
}
}
}


layout/activity_main.xml
<?xml version="1.0" encoding="utf-8"?>
<LinearLayout

android_layout_width="match_parent"
android_layout_height="match_parent"
android_padding="16dp"
android_orientation="vertical"
tools_context="com.blogspot.android_er.androidlistclient.MainActivity">

<TextView
android_layout_width="wrap_content"
android_layout_height="wrap_content"
android_layout_gravity="center_horizontal"
android_autoLink="web"
android_text="http://android-er.blogspot.com/"
android_textStyle="bold" />

<Button
android_id="@+id/readclient"
android_layout_width="match_parent"
android_layout_height="wrap_content"
android_textAllCaps="false"
android_text="Read Ip/MAC addresses"/>

<TextView
android_id="@+id/result"
android_layout_width="match_parent"
android_layout_height="wrap_content"
android_typeface="monospace"
android_textSize="24sp"/>
</LinearLayout>


Next:
- Lookup manufacturer info by MAC address, using www.macvendorlookup.com API
- Get HostName of WiFi hotspot clients, and check if it is still connected

Read More..

Display StreetViewPanoramaView in DialogFragment when user click on InfoWindow


Example modify from last example "Detect user click on InfoWindow, by implementing GoogleMap.OnInfoWindowClickListener()", to open DialogFragment with StreetViewPanoramaView when user click on InfoWindow.


MapsActivity.java
package com.blogspot.android_er.androidstudiomapapp;

import android.app.AlertDialog;
import android.app.Dialog;
import android.app.DialogFragment;
import android.app.Fragment;
import android.app.FragmentTransaction;
import android.content.DialogInterface;
import android.content.Intent;
import android.graphics.drawable.Drawable;
import android.net.Uri;
import android.os.Bundle;
import android.support.v7.app.AppCompatActivity;
import android.text.InputType;
import android.view.Menu;
import android.view.MenuItem;
import android.view.View;
import android.widget.EditText;
import android.widget.ImageView;
import android.widget.LinearLayout;
import android.widget.TextView;
import android.widget.Toast;

import com.google.android.gms.common.GoogleApiAvailability;
import com.google.android.gms.maps.CameraUpdateFactory;
import com.google.android.gms.maps.GoogleMap;
import com.google.android.gms.maps.OnMapReadyCallback;
import com.google.android.gms.maps.StreetViewPanoramaOptions;
import com.google.android.gms.maps.StreetViewPanoramaView;
import com.google.android.gms.maps.SupportMapFragment;
import com.google.android.gms.maps.model.LatLng;
import com.google.android.gms.maps.model.Marker;
import com.google.android.gms.maps.model.MarkerOptions;

public class MapsActivity extends AppCompatActivity implements OnMapReadyCallback,
GoogleMap.OnMapClickListener, GoogleMap.OnMapLongClickListener,
GoogleMap.OnMarkerDragListener, GoogleMap.InfoWindowAdapter {

private GoogleMap mMap;

@Override
protected void onCreate(Bundle savedInstanceState) {
super.onCreate(savedInstanceState);
setContentView(R.layout.activity_maps);
// Obtain the SupportMapFragment and get notified when the map is ready to be used.
SupportMapFragment mapFragment = (SupportMapFragment) getSupportFragmentManager()
.findFragmentById(R.id.map);
mapFragment.getMapAsync(this);

}

/**
* Manipulates the map once available.
* This callback is triggered when the map is ready to be used.
* This is where we can add markers or lines, add listeners or move the camera. In this case,
* we just add a marker near Sydney, Australia.
* If Google Play services is not installed on the device, the user will be prompted to install
* it inside the SupportMapFragment. This method will only be triggered once the user has
* installed Google Play services and returned to the app.
*/
@Override
public void onMapReady(GoogleMap googleMap) {
mMap = googleMap;
mMap.setOnMapClickListener(this);
mMap.setOnMapLongClickListener(this);
mMap.setOnMarkerDragListener(this);
mMap.setInfoWindowAdapter(this);
mMap.setOnInfoWindowClickListener(MyOnInfoWindowClickListener);
}

@Override
public boolean onCreateOptionsMenu(Menu menu) {
getMenuInflater().inflate(R.menu.activity_main, menu);
return super.onCreateOptionsMenu(menu);
}

@Override
public boolean onOptionsItemSelected(MenuItem item) {
switch (item.getItemId()) {
case R.id.menu_addmarkers:
addMarker();
return true;
case R.id.maptypeHYBRID:
if(mMap != null){
mMap.setMapType(GoogleMap.MAP_TYPE_HYBRID);
return true;
}
case R.id.maptypeNONE:
if(mMap != null){
mMap.setMapType(GoogleMap.MAP_TYPE_NONE);
return true;
}
case R.id.maptypeNORMAL:
if(mMap != null){
mMap.setMapType(GoogleMap.MAP_TYPE_NORMAL);
return true;
}
case R.id.maptypeSATELLITE:
if(mMap != null){
mMap.setMapType(GoogleMap.MAP_TYPE_SATELLITE);
return true;
}
case R.id.maptypeTERRAIN:
if(mMap != null){
mMap.setMapType(GoogleMap.MAP_TYPE_TERRAIN);
return true;
}
case R.id.menu_legalnotices:
String LicenseInfo = GoogleApiAvailability
.getInstance()
.getOpenSourceSoftwareLicenseInfo(MapsActivity.this);
AlertDialog.Builder LicenseDialog =
new AlertDialog.Builder(MapsActivity.this);
LicenseDialog.setTitle("Legal Notices");
LicenseDialog.setMessage(LicenseInfo);
LicenseDialog.show();
return true;
case R.id.menu_about:
AlertDialog.Builder aboutDialogBuilder =
new AlertDialog.Builder(MapsActivity.this);
aboutDialogBuilder.setTitle("About Me")
.setMessage("http://android-er.blogspot.com");

aboutDialogBuilder.setPositiveButton("visit",
new DialogInterface.OnClickListener() {
@Override
public void onClick(DialogInterface dialog, int which) {
String url = "http://android-er.blogspot.com";
Intent i = new Intent(Intent.ACTION_VIEW);
i.setData(Uri.parse(url));
startActivity(i);
}
});

aboutDialogBuilder.setNegativeButton("Dismiss",
new DialogInterface.OnClickListener() {
@Override
public void onClick(DialogInterface dialog, int which) {
dialog.cancel();
}
});

AlertDialog aboutDialog = aboutDialogBuilder.create();
aboutDialog.show();

return true;
}
return super.onOptionsItemSelected(item);
}

private void addMarker(){
if(mMap != null){

//create custom LinearLayout programmatically
LinearLayout layout = new LinearLayout(MapsActivity.this);
layout.setLayoutParams(new LinearLayout.LayoutParams(
LinearLayout.LayoutParams.MATCH_PARENT,
LinearLayout.LayoutParams.WRAP_CONTENT));
layout.setOrientation(LinearLayout.VERTICAL);

final EditText titleField = new EditText(MapsActivity.this);
titleField.setHint("Title");

final EditText latField = new EditText(MapsActivity.this);
latField.setHint("Latitude");
latField.setInputType(InputType.TYPE_CLASS_NUMBER
| InputType.TYPE_NUMBER_FLAG_DECIMAL
| InputType.TYPE_NUMBER_FLAG_SIGNED);

final EditText lonField = new EditText(MapsActivity.this);
lonField.setHint("Longitude");
lonField.setInputType(InputType.TYPE_CLASS_NUMBER
| InputType.TYPE_NUMBER_FLAG_DECIMAL
| InputType.TYPE_NUMBER_FLAG_SIGNED);

layout.addView(titleField);
layout.addView(latField);
layout.addView(lonField);

AlertDialog.Builder builder = new AlertDialog.Builder(this);
builder.setTitle("Add Marker");
builder.setView(layout);
AlertDialog alertDialog = builder.create();

builder.setPositiveButton("OK", new DialogInterface.OnClickListener() {
@Override
public void onClick(DialogInterface dialog, int which) {
boolean parsable = true;
Double lat = null, lon = null;

String strLat = latField.getText().toString();
String strLon = lonField.getText().toString();
String strTitle = titleField.getText().toString();

try{
lat = Double.parseDouble(strLat);
}catch (NumberFormatException ex){
parsable = false;
Toast.makeText(MapsActivity.this,
"Latitude does not contain a parsable double",
Toast.LENGTH_LONG).show();
}

try{
lon = Double.parseDouble(strLon);
}catch (NumberFormatException ex){
parsable = false;
Toast.makeText(MapsActivity.this,
"Longitude does not contain a parsable double",
Toast.LENGTH_LONG).show();
}

if(parsable){

LatLng targetLatLng = new LatLng(lat, lon);
MarkerOptions markerOptions =
new MarkerOptions().position(targetLatLng).title(strTitle);

markerOptions.draggable(true);

mMap.addMarker(markerOptions);
mMap.moveCamera(CameraUpdateFactory.newLatLng(targetLatLng));

}
}
});
builder.setNegativeButton("Cancel", null);

builder.show();
}else{
Toast.makeText(MapsActivity.this, "Map not ready", Toast.LENGTH_LONG).show();
}
}

@Override
public void onMapClick(LatLng latLng) {
Toast.makeText(MapsActivity.this,
"onMapClick: " + latLng.latitude + " : " + latLng.longitude,
Toast.LENGTH_LONG).show();
}

@Override
public void onMapLongClick(LatLng latLng) {
Toast.makeText(MapsActivity.this,
"onMapLongClick: " + latLng.latitude + " : " + latLng.longitude,
Toast.LENGTH_LONG).show();

//Add marker on LongClick position
MarkerOptions markerOptions =
new MarkerOptions().position(latLng).title(latLng.toString());
markerOptions.draggable(true);

mMap.addMarker(markerOptions);
}


@Override
public void onMarkerDragStart(Marker marker) {
marker.setTitle(marker.getPosition().toString());
marker.showInfoWindow();
marker.setAlpha(0.5f);
}

@Override
public void onMarkerDrag(Marker marker) {
marker.setTitle(marker.getPosition().toString());
marker.showInfoWindow();
marker.setAlpha(0.5f);
}

@Override
public void onMarkerDragEnd(Marker marker) {
marker.setTitle(marker.getPosition().toString());
marker.showInfoWindow();
marker.setAlpha(1.0f);
}

@Override
public View getInfoWindow(Marker marker) {
return null;
//return prepareInfoView(marker);
}

@Override
public View getInfoContents(Marker marker) {
//return null;
return prepareInfoView(marker);

}

private View prepareInfoView(Marker marker){
//prepare InfoView programmatically
LinearLayout infoView = new LinearLayout(MapsActivity.this);
LinearLayout.LayoutParams infoViewParams = new LinearLayout.LayoutParams(
LinearLayout.LayoutParams.WRAP_CONTENT, LinearLayout.LayoutParams.WRAP_CONTENT);
infoView.setOrientation(LinearLayout.HORIZONTAL);
infoView.setLayoutParams(infoViewParams);

ImageView infoImageView = new ImageView(MapsActivity.this);
//Drawable drawable = getResources().getDrawable(R.mipmap.ic_launcher);
Drawable drawable = getResources().getDrawable(android.R.drawable.ic_dialog_map);
infoImageView.setImageDrawable(drawable);
infoView.addView(infoImageView);

LinearLayout subInfoView = new LinearLayout(MapsActivity.this);
LinearLayout.LayoutParams subInfoViewParams = new LinearLayout.LayoutParams(
LinearLayout.LayoutParams.WRAP_CONTENT, LinearLayout.LayoutParams.WRAP_CONTENT);
subInfoView.setOrientation(LinearLayout.VERTICAL);
subInfoView.setLayoutParams(subInfoViewParams);

TextView subInfoLat = new TextView(MapsActivity.this);
subInfoLat.setText("Lat: " + marker.getPosition().latitude);
TextView subInfoLnt = new TextView(MapsActivity.this);
subInfoLnt.setText("Lnt: " + marker.getPosition().longitude);
subInfoView.addView(subInfoLat);
subInfoView.addView(subInfoLnt);
infoView.addView(subInfoView);

return infoView;
}

GoogleMap.OnInfoWindowClickListener MyOnInfoWindowClickListener
= new GoogleMap.OnInfoWindowClickListener(){
@Override
public void onInfoWindowClick(Marker marker) {
Toast.makeText(MapsActivity.this,
"onInfoWindowClick(): " +
marker.getPosition().latitude + " " +
marker.getPosition().longitude,
Toast.LENGTH_LONG).show();

showStreetViewDialog(marker.getPosition());
}
};

private void showStreetViewDialog(LatLng pos){
FragmentTransaction ft = getFragmentManager().beginTransaction();
Fragment prev = getFragmentManager().findFragmentByTag("streetview");
if (prev != null) {
ft.remove(prev);
}
ft.addToBackStack(null);

DialogFragment newFragment = StrretViewDialogFragment.newInstance(pos);
newFragment.show(ft, "streetview");
}


public static class StrretViewDialogFragment extends DialogFragment {

LatLng latLng;

static StrretViewDialogFragment newInstance(LatLng latLng) {
StrretViewDialogFragment f = new StrretViewDialogFragment();

Bundle args = new Bundle();
args.putDouble("latitude", latLng.latitude);
args.putDouble("longitude", latLng.longitude);
f.setArguments(args);

return f;
}

@Override
public Dialog onCreateDialog(Bundle savedInstanceState) {
latLng = new LatLng(getArguments().getDouble("latitude"),
getArguments().getDouble("longitude"));

LinearLayout layout = new LinearLayout(getActivity());
layout.setLayoutParams(new LinearLayout.LayoutParams(
LinearLayout.LayoutParams.MATCH_PARENT,
LinearLayout.LayoutParams.MATCH_PARENT));
layout.setOrientation(LinearLayout.VERTICAL);

StreetViewPanoramaOptions options=new StreetViewPanoramaOptions();
options.position(latLng);
StreetViewPanoramaView streetViewPanoramaView =
new StreetViewPanoramaView(getActivity(), options);
streetViewPanoramaView.setLayoutParams(
new LinearLayout.LayoutParams(
LinearLayout.LayoutParams.MATCH_PARENT,
LinearLayout.LayoutParams.MATCH_PARENT));
streetViewPanoramaView.setPadding(5, 5, 5, 5);
streetViewPanoramaView.onCreate(savedInstanceState);

layout.addView(streetViewPanoramaView);

return new AlertDialog.Builder(getActivity())
.setTitle(latLng.latitude + " : " + latLng.longitude)
.setPositiveButton("OK", null)
.setView(layout)
.create();
}
}


}


reference: https://developers.google.com/android/reference/com/google/android/gms/maps/StreetViewPanoramaView


~ Step-by-step of Android Google Maps Activity using Google Maps Android API v2, on Android Studio

Read More..
Powered by Blogger.