Make TextView selectable select and copy


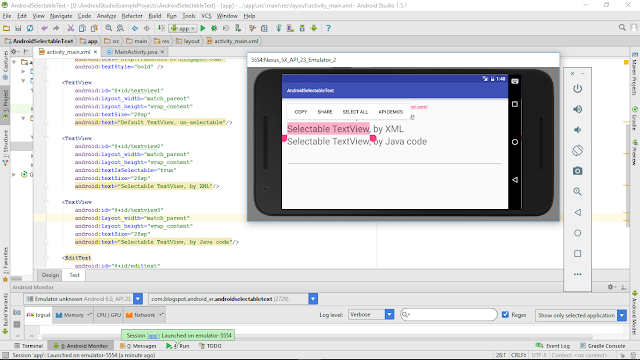
Example to make TextView selectable, you can select and copy text from TextView and paste to other field, such as EditText.


Add android_textIsSelectable="true" in layout XML:
<?xml version="1.0" encoding="utf-8"?>
<LinearLayout

android_layout_width="match_parent"
android_layout_height="match_parent"
android_padding="16dp"
android_orientation="vertical"
tools_context="com.blogspot.android_er.androidselectabletext.MainActivity">

<TextView
android_layout_width="wrap_content"
android_layout_height="wrap_content"
android_layout_gravity="center_horizontal"
android_autoLink="web"
android_text="http://android-er.blogspot.com/"
android_textStyle="bold" />

<TextView
android_id="@+id/textview1"
android_layout_width="match_parent"
android_layout_height="wrap_content"
android_textSize="28sp"
android_text="Default TextView, un-selectable"/>

<TextView
android_id="@+id/textview2"
android_layout_width="match_parent"
android_layout_height="wrap_content"
android:textIsSelectable="true"
android_textSize="28sp"
android_text="Selectable TextView, by XML"/>

<TextView
android_id="@+id/textview3"
android_layout_width="match_parent"
android_layout_height="wrap_content"
android_textSize="28sp"
android_text="Selectable TextView, by Java code"/>

<EditText
android_id="@+id/edittext"
android_layout_width="match_parent"
android_layout_height="wrap_content"
android_textSize="28sp"/>
</LinearLayout>


or call setTextIsSelectable(true) method of the TextView object in Java code:
package com.blogspot.android_er.androidselectabletext;

import android.os.Bundle;
import android.support.v7.app.AppCompatActivity;
import android.widget.EditText;
import android.widget.TextView;

public class MainActivity extends AppCompatActivity {

TextView textView1, textView2, textView3;
EditText editText;

@Override
protected void onCreate(Bundle savedInstanceState) {
super.onCreate(savedInstanceState);
setContentView(R.layout.activity_main);

textView1 = (TextView)findViewById(R.id.textview1);
textView2 = (TextView)findViewById(R.id.textview2);
textView3 = (TextView)findViewById(R.id.textview3);
textView3.setTextIsSelectable(true);
editText = (EditText)findViewById(R.id.edittext);
}
}


Read More..

How to Copy ROM zip file to the freshly wiped device


Have you ever been in a situation where you mistakenly (or not) wiped the content of the internal storage (including system partition and virtual SD card) on your phone or tablet and unfortunately it doesnt support external storage? Now you cant flash desired custom ROM because you removed it and the device cant be booted due to wiped system partition. Dont worry - its very easy to fix!

Here are the steps you need to follow to copy the correct rom.zip package to your internal storage:
  1. Download this mini-sdk package and extract it to c:mini-sdk
  2. Rename the custom ROM package you want to flash to "rom.zip" and copy it to c:mini-sdk
  3. Connect your device to the PC
  4. Boot your device in recovery mode
  5. Open a command prompt on the PC (cmd.exe), type and confirm each command with ENTER:
  6. cd /d c:mini-sdk
  7. adb shell
  8. mount /data (error might mean that /data partition is already mounted)
  9. on Android 4.2 and above: mkdir -p /data/media/0
  10. on Android 4.1.2 and below: mkdir -p /data/media
  11. exit
  12. on Android 4.2 and above: adb push rom.zip /data/media/0
  13. on Android 4.1.2 and below: adb push rom.zip /data/media
  14. Wait for a few minutes until the file is copied. It will looks like command shell is not responding, but that means its still copying. Wait patiently until youll see blinking cursor again.
  15. Depends on your custom recovery, use the navigation keys to flash the custom rom.zip package in a typical way you used to flash custom ROMs. It should be on your internal storage now. Done!
Have any questions or comments? Feel free to share! Also, if you like this article, please use media sharing buttons (Twitter, G+, Facebook) below this post!
Read More..

How to Copy a Free AVI to DVD for a Mac

AVI (Audio Video Interleave) is type of video file. It is a container file that can be encoded in different ways. DVD is not a file type but a sort of storage device for information. If you want to convert an AVI file to a file that a standard DVD player can read , you need to convert the AVI file to MPEG-2. Converting an AVI file to DVD format on a Mac is easy with freeware called Burn.

Instructions

Things Youll Need:

  • Burn
  • Mac OS X 10.3.9 and up
  1. Step 1

    Download Burn for your Mac (see Resources below). Open the ZIP file that contains Burn on your Desktop and copy the Burn icon into your Applications folder and your Dock. To copy Burn, drag and drop it in the proper location.

  2. Step 2

    Open Burn by double-clicking on it. A new window will open. Select "Video" from the menu at the top of the window. Title the file you are converting. Select "DVD" from the scroll-down window next to the title of the file.

  3. Step 3

    Click on the "+" sign in the lower left-hand side of the window to select the AVI file to convert to DVD. Select the file and click "Open" in the lower right-hand side of the window. A new window will open.

  4. Step 4

    Select a destination for the new MPEG-2 file. Select a region from the scroll-down menu titled "Region." Click "Open" to convert the AVI to MPEG-2.

  5. Step 5

    Insert a DVD into your Super Drive. Click "Burn" in the lower right-hand side of the window once the AVI is converted to MPEG 2 on your Mac computer. Burn will burn the MPEG-2 file to DVD.

Read More..

Blog Archive

Powered by Blogger.