Implement interactive DialogFragment


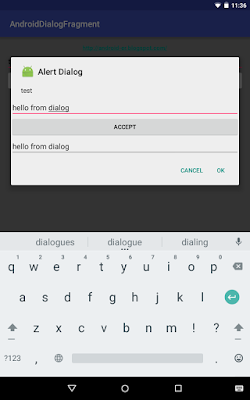
This example modify from last example of "Create DialogFragment with AlertDialog.Builder", to implement interactive DialogFragment. Something sent from main activity to DialogFragment, and something editable in DialogFragment, and something sent from DialogFragment back to main activity.


MainActivity.java
package com.blogspot.android_er.androiddialogfragment;

import android.app.AlertDialog;
import android.app.Dialog;
import android.app.DialogFragment;
import android.app.Fragment;
import android.app.FragmentTransaction;
import android.content.DialogInterface;
import android.os.Bundle;
import android.support.v7.app.AppCompatActivity;
import android.view.View;
import android.widget.Button;
import android.widget.EditText;
import android.widget.LinearLayout;
import android.widget.Toast;

public class MainActivity extends AppCompatActivity {

EditText inputTextField;

@Override
protected void onCreate(Bundle savedInstanceState) {
super.onCreate(savedInstanceState);
setContentView(R.layout.activity_main);

inputTextField = (EditText)findViewById(R.id.inputtext);
Button btnOpen = (Button)findViewById(R.id.opendialog);
btnOpen.setOnClickListener(new View.OnClickListener() {
@Override
public void onClick(View v) {
showDialog();
}
});
}


void showDialog() {
FragmentTransaction ft = getFragmentManager().beginTransaction();
Fragment prev = getFragmentManager().findFragmentByTag("dialog");
if (prev != null) {
ft.remove(prev);
}
ft.addToBackStack(null);

String inputText = inputTextField.getText().toString();

DialogFragment newFragment = MyDialogFragment.newInstance(inputText, inputTextField);
newFragment.show(ft, "dialog");

}

public static class MyDialogFragment extends DialogFragment {

String mText;
static EditText backTextField;

static MyDialogFragment newInstance(String text, EditText editText) {
backTextField = editText;
MyDialogFragment f = new MyDialogFragment();

Bundle args = new Bundle();
args.putString("text", text);
f.setArguments(args);

return f;
}

@Override
public Dialog onCreateDialog(Bundle savedInstanceState) {
mText = getArguments().getString("text");

//create custom LinearLayout programmatically
LinearLayout layout = new LinearLayout(getActivity());
layout.setLayoutParams(new LinearLayout.LayoutParams(
LinearLayout.LayoutParams.MATCH_PARENT,
LinearLayout.LayoutParams.WRAP_CONTENT));
layout.setOrientation(LinearLayout.VERTICAL);

final EditText editField = new EditText(getActivity());
editField.setHint("type something");
Button btnAccept = new Button(getActivity());
btnAccept.setText("Accept");
final EditText textField = new EditText(getActivity());
btnAccept.setOnClickListener(new View.OnClickListener() {
@Override
public void onClick(View v) {
textField.setText(editField.getText().toString());
}
});

layout.addView(editField);
layout.addView(btnAccept);
layout.addView(textField);

return new AlertDialog.Builder(getActivity())
.setIcon(R.mipmap.ic_launcher)
.setTitle("Alert Dialog")
.setMessage(mText)
.setPositiveButton("OK",
new DialogInterface.OnClickListener() {
public void onClick(DialogInterface dialog, int whichButton) {
Toast.makeText(getActivity(),
textField.getText(),
Toast.LENGTH_LONG).show();
backTextField.setText(textField.getText());
}
}
)
.setNegativeButton("Cancel", null)
.setView(layout)
.create();
}

}
}


layout/activity_main.xml
<?xml version="1.0" encoding="utf-8"?>
<LinearLayout


android_layout_width="match_parent"
android_layout_height="match_parent"
android_padding="16dp"
android_orientation="vertical"
tools_context=".MainActivity"
android_background="#808080">

<TextView
android_layout_width="wrap_content"
android_layout_height="wrap_content"
android_layout_gravity="center_horizontal"
android_autoLink="web"
android_text="http://android-er.blogspot.com/"
android_textStyle="bold" />

<EditText
android_id="@+id/inputtext"
android_layout_width="match_parent"
android_layout_height="wrap_content"
android_hint="Type something"/>
<Button
android_id="@+id/opendialog"
android_layout_width="match_parent"
android_layout_height="wrap_content"
android_text="Open DialogFragment"
android_textAllCaps="false"/>

</LinearLayout>


Read More..

Add and Remove view dynamically with EditText AutoCompleteTextView inside


My previous post a example of "Add and Remove view dynamically", It is another version to have a EditText (AutoCompleteTextView actually) inside the dynamic view.


MainActivity.java
package com.blogspot.android_er.androiddynamicview;

import android.content.Context;
import android.os.Bundle;
import android.support.v7.app.AppCompatActivity;
import android.text.method.ScrollingMovementMethod;
import android.view.LayoutInflater;
import android.view.View;
import android.widget.ArrayAdapter;
import android.widget.AutoCompleteTextView;
import android.widget.Button;
import android.widget.LinearLayout;
import android.widget.TextView;

public class MainActivity extends AppCompatActivity {

AutoCompleteTextView textIn;
Button buttonAdd;
LinearLayout container;
TextView reList, info;

private static final String[] NUMBER = new String[] {
"One", "Two", "Three", "Four", "Five",
"Six", "Seven", "Eight", "Nine", "Ten"
};
ArrayAdapter<String> adapter;

@Override
protected void onCreate(Bundle savedInstanceState) {
super.onCreate(savedInstanceState);
setContentView(R.layout.activity_main);

adapter = new ArrayAdapter<String>(this,
android.R.layout.simple_dropdown_item_1line, NUMBER);

textIn = (AutoCompleteTextView)findViewById(R.id.textin);
textIn.setAdapter(adapter);

buttonAdd = (Button)findViewById(R.id.add);
container = (LinearLayout) findViewById(R.id.container);
reList = (TextView)findViewById(R.id.relist);
reList.setMovementMethod(new ScrollingMovementMethod());
info = (TextView)findViewById(R.id.info);
info.setMovementMethod(new ScrollingMovementMethod());

buttonAdd.setOnClickListener(new View.OnClickListener(){
@Override
public void onClick(View v) {
LayoutInflater layoutInflater =
(LayoutInflater) getBaseContext().getSystemService(Context.LAYOUT_INFLATER_SERVICE);
final View addView = layoutInflater.inflate(R.layout.row, null);
AutoCompleteTextView textOut = (AutoCompleteTextView)addView.findViewById(R.id.textout);
textOut.setAdapter(adapter);
textOut.setText(textIn.getText().toString());
Button buttonRemove = (Button)addView.findViewById(R.id.remove);

final View.OnClickListener thisListener = new View.OnClickListener(){
@Override
public void onClick(View v) {
info.append("thisListener called: " + this + " ");
info.append("Remove addView: " + addView + " ");
((LinearLayout)addView.getParent()).removeView(addView);

listAllAddView();
}
};

buttonRemove.setOnClickListener(thisListener);
container.addView(addView);

info.append(
"thisListener: " + thisListener + " "
+ "addView: " + addView + " "
);

listAllAddView();
}
});
}

private void listAllAddView(){
reList.setText("");

int childCount = container.getChildCount();
for(int i=0; i<childCount; i++){
View thisChild = container.getChildAt(i);
reList.append(thisChild + " ");

AutoCompleteTextView childTextView = (AutoCompleteTextView) thisChild.findViewById(R.id.textout);
String childTextViewValue = childTextView.getText().toString();
reList.append("= " + childTextViewValue + " ");
}
}

}


layout/activity_main.xml
<?xml version="1.0" encoding="utf-8"?>
<LinearLayout

android_layout_width="match_parent"
android_layout_height="match_parent"
android_orientation="horizontal"
android_padding="16dp"
tools_context="com.blogspot.android_er.androiddynamicview.MainActivity">


<LinearLayout
android_layout_width="0dp"
android_layout_height="match_parent"
android_layout_weight="1"
android_orientation="vertical">

<RelativeLayout
android_layout_width="match_parent"
android_layout_height="wrap_content">

<Button
android_id="@+id/add"
android_layout_width="wrap_content"
android_layout_height="wrap_content"
android_layout_alignParentRight="true"
android_text="Add" />

<AutoCompleteTextView
android_id="@+id/textin"
android_layout_width="match_parent"
android_layout_height="wrap_content"
android_layout_alignParentLeft="true"
android_layout_toLeftOf="@id/add" />
</RelativeLayout>

<LinearLayout
android_id="@+id/container"
android_layout_width="match_parent"
android_layout_height="wrap_content"
android_orientation="vertical"></LinearLayout>

</LinearLayout>

<LinearLayout
android_layout_width="0dp"
android_layout_height="match_parent"
android_layout_weight="1"
android_orientation="vertical">

<TextView
android_layout_width="wrap_content"
android_layout_height="wrap_content"
android_layout_gravity="center_horizontal"
android_autoLink="web"
android_text="http://android-er.blogspot.com/"
android_textStyle="bold" />

<TextView
android_id="@+id/relist"
android_layout_width="match_parent"
android_layout_height="0dp"
android_layout_weight="1"
android_textStyle="bold"
android_background="#E0E0E0"/>
<TextView
android_id="@+id/info"
android_layout_width="match_parent"
android_layout_height="0dp"
android_layout_weight="1"
android_textStyle="italic"
android_background="#D0D0D0"
android_gravity="bottom"/>

</LinearLayout>
</LinearLayout>


layout/row.xml
<RelativeLayout 

android_layout_width="match_parent"
android_layout_height="wrap_content">
<Button
android_id="@+id/remove"
android_layout_width="wrap_content"
android_layout_height="wrap_content"
android_layout_alignParentRight="true"
android_text="Remove"/>
<AutoCompleteTextView
android_id="@+id/textout"
android_layout_width="match_parent"
android_layout_height="wrap_content"
android_layout_alignParentLeft="true"
android_layout_toLeftOf="@id/remove"/>
</RelativeLayout>

download filesDownload the files (Android Studio Format) .

Read More..

How a culture of collaboration sparks new ideas Q A with PwC

Editors note: As we ramp up for Atmosphere15, we’re sharing a few sneak peeks from some of the disruptors joining us as speakers. Today, we speak with Deborah Bothun, US Entertainment, Media and Communications Leader for PwC. Register here for the June 2nd (in North and South America and Europe) and 3rd (in Asia Pacific) event, where Deborah and leaders from Pierre Herme Paris and Waitrose share insights on inspiring productive teams. 

Innovation’s a buzzword today that means a lot of different things to different companies. Whats one essential element of innovation for your team?

In my role at PwC, I have the pleasure of launching numerous primary research studies each year. Consumers, who view organizations with both the employee and consumer lens, tell us that innovation and collaboration are the two most influential attributes affecting employee and consumer experiences. Consumers also tell us that the differentiator is the actual vision of what your company can accomplish as a result of innovation and collaboration. And interestingly enough, CEOs around the world are telling us the exact same thing. This year, 68% of the CEOs we surveyed said that collaboration is one of the top three ways to create value in an organization.

Last October, PwC announced adoption of Google for Work for 45,000 employees in the U.S. and Australia. What was the process for adopting Google Apps across the company?

Our people solve complex problems as advisors to our clients, so we leveraged problem solving to launch Google Apps. As part of our launch plan, we developed a series of innovation workshops. where we tasked teams with solving real business challenges using the tools in the Apps suite. They were asked to create new ways to save time and add efficiency to current processes. And we discovered that better tools for collaboration did indeed help teams to be more creative and inspired. In fact, each workshop produced an average of 100-175 new ideas from the challenges.

How has using Google Apps affected the culture at PwC?

We all talk about collaboration, but it’s not easy to do. Everyone needs to get involved and leverage Google Apps to make the cultural shift towards collaboration. By giving our teams the tools to collaborate, we’re helping them to create and compete in news ways.

Join Deborah and leaders from Pierre Herme Paris and Waitrose in more discussion on collaboration and productive teams at Atmosphere, on June 2nd (in North and South America and Europe) and June 3rd (in Asia Pacific). Register here.
Read More..

Cameras in Phones what do we really need


An awful lot is being said about mobile phone cameras just lately; and we have HTC to thank for opening the conversation with the introduction of their HTC One which has half as many pixels at twice the size of anyone elses. Before we begin Im going to get some ground rules. I wont use marketing terms; so I will talk about how many pixels a camera sensor has, and what size they are. You wont hear me talking about mega- or ultra- anything. Next is that I will show my meaning with diagrams - Im a visual person and it helps me to explain. Please bear with me on this post; theres a lot to read but its worth it at the end.

A digital camera uses a lens to focus an image onto an oblong of special material which has a number of sensors on it; each sensor is called a pixel and usually contains three sub-pixels; a red, a blue (actually two blues but dont worry about that) and a green one. Each of these sends a signal to the camera depending how much light of that colour is falling onto it. Bigger pixels produce a bigger signal for the same amount of light than smaller ones. When signals are small, the amount of noise (erroneous signal levels produced simply by electrons moving around) is a bigger percentage of the whole signal because noise is a constant backdrop. When the signals are bigger therefore, its easier to pick out the signal, from the noise. More noise means that the signal produced by a smaller pixel is less accurate which means the final photo may not have exactly the same colour from each pixel receiving the same light.

Camera sensors line up their pixels in rows and columns - and the cameras rating is often quoted by counting them. For instance a 10MP camera contains ten million pixels (roughly). These are arranged in a rectangular grid with a side length ratio of 16:9 - so thats 4213 pixels across and 2370 pixels high. If you have a sensor which is 7mm across, each pixel is 7/4213=1.662 microns across (microns = thousandths of a millimetre).

In the real world, standard sensor sizes and pixel sizes exist; a 13 million pixel camera in a phone will have pixels about 1.1 microns across; this gives a sensor width of about 4.55mm (there are 4128 pixels across the image). In the HTC One, the best photos are 2688 pixels across, and the pixels are 2 microns across giving a sensor width of about 5.4mm.
Figure 1 - 4 million large pixels

Figure 2 - 8 million (smaller) pixels on same size sensor
Now we can start looking at construction. Take a look at Figure 1. This shows a camera with large pixels - the lens is focussing the image onto an area exactly the same size as the sensor. In Figure 2, we gave the camera more pixels (which really does give more detail in the image but at the expense of noise and grain - and also less sensitivity at low light levels). Of course; straight away you want more, BIGGER pixels. Figure 3 shows that if you make that happen, the image doesnt cover the whole sensor; the light falls on a little bit of it. So - in Figure 4 we move the sensor further away to ensure the image covers all the pixels.
Figure 3 - 8 million large pixels with no other changes

Figure 4 - Sensor moved away, but the lens size is unchanged.
However; the same amount of light, entering the lens, is now spread over a wider area: this dims the light hitting each individual pixel, which reduces the signal output and increases the noise. The only way to change this is to make the lens bigger - the aperture wider - so that more light gets in. This is shown finally in Figure 5.
Figure 5 - all required changes incorporated.
So - how far back do we have to move the lens? Simple trig shows us the answer. Imagine the "field of view" of the lens is about 60° (not unreasonable): the light coming in from the left and right cross over in the centre of the lens and make a triangle with the sensor as the base... an equilateral triangle is formed with all angles at 60° and all sides the same length (lets call it 5.4mm to stick with the HTC Ones sensor size). So the lens must be 2.7mm away from the sensor. If we now make the sensor an 8MP one (3800x2140 pixels) that gives a width of 7.6mm - the lens still has a viewing angle of 60° so that means the sensor has to be 3.8mm away from the lens. Obviously I have used 60° as the lens viewing angle because it makes the angles, sines and side lengths easy to calculate - the numbers are probably quite different in real life but you get the idea: to get double the megapixels you have to move the sensor further from the lens, which means you need a bigger lens to gather the light needed to adequately illuminate it. Lenses very rapidly increase in price with size - a lens 4mm across instead of 2mm might cost three or four times as much. (BTW - the large circular opening on the back of the phone is NOT the lens; the lens is the tiny dark speck in the centre of it).

In practical terms for a smartphone? This means that, to get an 8 million pixel camera, with pixels 2 microns across, your phone would need to be about 16-18mm thick (at least at the cameras location); and the phone would cost upwards of US$1000 - possibly even more - JUST because of the lens.

This isnt something which can be corrected with better design, or better lenses; the only way to mitigate this increase in size and cost would be to make smaller pixels which had the properties of larger ones - and that my friends is the nirvana of a pixel scientist! The very best technology available is going into these phones - and with todays tech were stuck with these limitations. In another article Ill talk about why I believe 4MP at 2 microns across is enough.


This article is also to be found on its author personal blog.

Have any questions or comments? Feel free to share! Also, if you like this article, please use the media sharing buttons (Twitter, G+, Facebook) under this post!
Read More..

Interpolator effect on ObjectAnimator


This post demo various Interpolator effect on ObjectAnimator. You can also download the demo APK, from the link on the bottom.


MainActivity.java
package com.blogspot.android_er.androidobjectanimator;

import android.animation.ObjectAnimator;
import android.animation.TimeInterpolator;
import android.os.Bundle;
import android.support.v4.view.animation.FastOutLinearInInterpolator;
import android.support.v4.view.animation.FastOutSlowInInterpolator;
import android.support.v4.view.animation.LinearOutSlowInInterpolator;
import android.support.v7.app.AppCompatActivity;
import android.view.View;
import android.view.animation.AccelerateDecelerateInterpolator;
import android.view.animation.AccelerateInterpolator;
import android.view.animation.AnticipateInterpolator;
import android.view.animation.AnticipateOvershootInterpolator;
import android.view.animation.BounceInterpolator;
import android.view.animation.CycleInterpolator;
import android.view.animation.DecelerateInterpolator;
import android.view.animation.LinearInterpolator;
import android.view.animation.OvershootInterpolator;
import android.widget.Button;
import android.widget.ImageView;
import android.widget.LinearLayout;
import android.widget.Toast;

public class MainActivity extends AppCompatActivity {

LinearLayout playGround;
ImageView image;

AccelerateDecelerateInterpolator accelerateDecelerateInterpolator;
AccelerateInterpolator accelerateInterpolator;
AnticipateInterpolator anticipateInterpolator;
AnticipateOvershootInterpolator anticipateOvershootInterpolator;
BounceInterpolator bounceInterpolator;
CycleInterpolator cycleInterpolator;
DecelerateInterpolator decelerateInterpolator;
FastOutLinearInInterpolator fastOutLinearInInterpolator;
FastOutSlowInInterpolator fastOutSlowInInterpolator;
LinearInterpolator linearInterpolator;
LinearOutSlowInInterpolator linearOutSlowInInterpolator;
OvershootInterpolator overshootInterpolator;

@Override
protected void onCreate(Bundle savedInstanceState) {
super.onCreate(savedInstanceState);
setContentView(R.layout.activity_main);

playGround = (LinearLayout)findViewById(R.id.playground);
image = (ImageView)findViewById(R.id.image);
image.setOnClickListener(new View.OnClickListener() {
@Override
public void onClick(View v) {
Toast.makeText(MainActivity.this, "Clicked!", Toast.LENGTH_SHORT).show();
}
});

Button btnNull = (Button)findViewById(R.id.bNull);
btnNull.setOnClickListener(new View.OnClickListener() {
@Override
public void onClick(View v) {
prepareObjectAnimator(null);
}
});

Button btnAccelerateDecelerateInterpolator
= (Button)findViewById(R.id.bAccelerateDecelerateInterpolator);
btnAccelerateDecelerateInterpolator.setOnClickListener(new View.OnClickListener() {
@Override
public void onClick(View v) {
prepareObjectAnimator(accelerateDecelerateInterpolator);
}
});

Button btnAccelerateInterpolator = (Button)findViewById(R.id.bAccelerateInterpolator);
btnAccelerateInterpolator.setOnClickListener(new View.OnClickListener() {
@Override
public void onClick(View v) {
prepareObjectAnimator(accelerateInterpolator);
}
});

Button btnAnticipateInterpolator = (Button)findViewById(R.id.bAnticipateInterpolator);
btnAnticipateInterpolator.setOnClickListener(new View.OnClickListener() {
@Override
public void onClick(View v) {
prepareObjectAnimator(anticipateInterpolator);
}
});

Button btnAnticipateOvershootInterpolator
= (Button)findViewById(R.id.bAnticipateOvershootInterpolator);
btnAnticipateOvershootInterpolator.setOnClickListener(new View.OnClickListener() {
@Override
public void onClick(View v) {
prepareObjectAnimator(anticipateOvershootInterpolator);
}
});

Button btnBounceInterpolator = (Button)findViewById(R.id.bBounceInterpolator);
btnBounceInterpolator.setOnClickListener(new View.OnClickListener() {
@Override
public void onClick(View v) {
prepareObjectAnimator(bounceInterpolator);
}
});

Button btnCycleInterpolator = (Button)findViewById(R.id.bCycleInterpolator);
btnCycleInterpolator.setOnClickListener(new View.OnClickListener() {
@Override
public void onClick(View v) {
prepareObjectAnimator(cycleInterpolator);
}
});

Button btnDecelerateInterpolator = (Button)findViewById(R.id.bDecelerateInterpolator);
btnDecelerateInterpolator.setOnClickListener(new View.OnClickListener() {
@Override
public void onClick(View v) {
prepareObjectAnimator(decelerateInterpolator);
}
});

Button btnFastOutLinearInInterpolator
= (Button)findViewById(R.id.bFastOutLinearInInterpolator);
btnFastOutLinearInInterpolator.setOnClickListener(new View.OnClickListener() {
@Override
public void onClick(View v) {
prepareObjectAnimator(fastOutLinearInInterpolator);
}
});

Button btnFastOutSlowInInterpolator
= (Button)findViewById(R.id.bFastOutSlowInInterpolator);
btnFastOutSlowInInterpolator.setOnClickListener(new View.OnClickListener() {
@Override
public void onClick(View v) {
prepareObjectAnimator(fastOutSlowInInterpolator);
}
});

Button btnLinearInterpolator = (Button)findViewById(R.id.bLinearInterpolator);
btnLinearInterpolator.setOnClickListener(new View.OnClickListener() {
@Override
public void onClick(View v) {
prepareObjectAnimator(linearInterpolator);
}
});

Button btnOvershootInterpolator = (Button)findViewById(R.id.bOvershootInterpolator);
btnOvershootInterpolator.setOnClickListener(new View.OnClickListener() {
@Override
public void onClick(View v) {
prepareObjectAnimator(overshootInterpolator);
}
});

Button btnLinearOutSlowInInterpolator
= (Button)findViewById(R.id.bLinearOutSlowInInterpolator);
btnLinearOutSlowInInterpolator.setOnClickListener(new View.OnClickListener() {
@Override
public void onClick(View v) {
prepareObjectAnimator(linearOutSlowInInterpolator);
}
});

prepareInterpolator();
}

private void prepareInterpolator(){
accelerateDecelerateInterpolator = new AccelerateDecelerateInterpolator();
accelerateInterpolator = new AccelerateInterpolator();
anticipateInterpolator = new AnticipateInterpolator();
anticipateOvershootInterpolator = new AnticipateOvershootInterpolator();
bounceInterpolator = new BounceInterpolator();
cycleInterpolator = new CycleInterpolator(2);
decelerateInterpolator = new DecelerateInterpolator();
fastOutLinearInInterpolator = new FastOutLinearInInterpolator();
fastOutSlowInInterpolator = new FastOutSlowInInterpolator();
linearInterpolator = new LinearInterpolator();
linearOutSlowInInterpolator = new LinearOutSlowInInterpolator();
overshootInterpolator = new OvershootInterpolator();
}

private void prepareObjectAnimator(TimeInterpolator timeInterpolator){
//float w = (float)playGround.getWidth();
float h = (float)playGround.getHeight();
float propertyStart = 0f;
float propertyEnd = -(h/2 - (float)image.getHeight()/2);
String propertyName = "translationY";
ObjectAnimator objectAnimator
= ObjectAnimator.ofFloat(image, propertyName, propertyStart, propertyEnd);
objectAnimator.setDuration(2000);
objectAnimator.setRepeatCount(1);
objectAnimator.setRepeatMode(ObjectAnimator.REVERSE);
objectAnimator.setInterpolator(timeInterpolator);
objectAnimator.start();
}
}


layout/activity_main.xml
<?xml version="1.0" encoding="utf-8"?>
<LinearLayout

android_layout_width="match_parent"
android_layout_height="match_parent"
android_orientation="horizontal"
android_padding="16dp"
tools_context=".MainActivity">

<LinearLayout
android_layout_width="0dp"
android_layout_height="match_parent"
android_layout_weight="1"
android_orientation="vertical">

<TextView
android_layout_width="wrap_content"
android_layout_height="wrap_content"
android_layout_gravity="center_horizontal"
android_autoLink="web"
android_text="http://android-er.blogspot.com/"
android_textStyle="bold" />

<LinearLayout
android_id="@+id/playground"
android_layout_width="match_parent"
android_layout_height="match_parent"
android_layout_margin="10dp"
android_background="#E0E0E0"
android_gravity="center"
android_orientation="vertical">

<ImageView
android_id="@+id/image"
android_layout_width="wrap_content"
android_layout_height="wrap_content"
android_layout_gravity="center"
android_src="@mipmap/ic_launcher" />
</LinearLayout>
</LinearLayout>

<ScrollView
android_layout_width="0dp"
android_layout_height="match_parent"
android_layout_weight="1">

<LinearLayout
android_layout_width="match_parent"
android_layout_height="wrap_content"
android_orientation="vertical">

<Button
android_id="@+id/bNull"
android_layout_width="match_parent"
android_layout_height="wrap_content"
android_text="Interpolator = null (LinearInterpolator)"
android_textAllCaps="false" />

<Button
android_id="@+id/bAccelerateDecelerateInterpolator"
android_layout_width="match_parent"
android_layout_height="wrap_content"
android_text="AccelerateDecelerateInterpolator (default)"
android_textAllCaps="false" />

<Button
android_id="@+id/bAccelerateInterpolator"
android_layout_width="match_parent"
android_layout_height="wrap_content"
android_text="AccelerateInterpolator"
android_textAllCaps="false" />

<Button
android_id="@+id/bAnticipateInterpolator"
android_layout_width="match_parent"
android_layout_height="wrap_content"
android_text="AnticipateInterpolator"
android_textAllCaps="false" />

<Button
android_id="@+id/bAnticipateOvershootInterpolator"
android_layout_width="match_parent"
android_layout_height="wrap_content"
android_text="AnticipateOvershootInterpolator"
android_textAllCaps="false" />

<Button
android_id="@+id/bBounceInterpolator"
android_layout_width="match_parent"
android_layout_height="wrap_content"
android_text="BounceInterpolator"
android_textAllCaps="false" />

<Button
android_id="@+id/bCycleInterpolator"
android_layout_width="match_parent"
android_layout_height="wrap_content"
android_text="CycleInterpolator"
android_textAllCaps="false" />

<Button
android_id="@+id/bDecelerateInterpolator"
android_layout_width="match_parent"
android_layout_height="wrap_content"
android_text="DecelerateInterpolator"
android_textAllCaps="false" />

<Button
android_id="@+id/bFastOutLinearInInterpolator"
android_layout_width="match_parent"
android_layout_height="wrap_content"
android_text="FastOutLinearInInterpolator"
android_textAllCaps="false" />

<Button
android_id="@+id/bFastOutSlowInInterpolator"
android_layout_width="match_parent"
android_layout_height="wrap_content"
android_text="FastOutSlowInInterpolator"
android_textAllCaps="false" />

<Button
android_id="@+id/bLinearInterpolator"
android_layout_width="match_parent"
android_layout_height="wrap_content"
android_text="LinearInterpolator"
android_textAllCaps="false" />

<Button
android_id="@+id/bLinearOutSlowInInterpolator"
android_layout_width="match_parent"
android_layout_height="wrap_content"
android_text="LinearOutSlowInInterpolator"
android_textAllCaps="false" />

<Button
android_id="@+id/bOvershootInterpolator"
android_layout_width="match_parent"
android_layout_height="wrap_content"
android_text="OvershootInterpolator"
android_textAllCaps="false" />

</LinearLayout>

</ScrollView>

</LinearLayout>


download filesDownload the files (Android Studio Format) .

download filesDownload the demo APK.


~ Old example of Various effect of interpolator in Android Animation

Read More..

Enhancements to the Classroom Share Button

Originally posted on Google Apps Developer Blog

Posted by Andrew Garrett, Software Engineer, Classroom API and Michael Stillwell, Developer Advocate, Google Apps

By popular developer request, the Classroom Share Button now supports JavaScript callbacks and a question post type (in addition to announcements and assignments).

The following callbacks are supported:

  • onsharestart is called immediately after the user clicks the share button
  • onsharecomplete is called after the user successfully shares the URL to their class

The callbacks are supported by both the share tag and the JavaScript API, and they work on all supported browsers except Internet Explorer.

What can you use this for? Theres a bunch of different things you can do, but to get you started, here are some suggestions:

  • Analytics and reporting How frequently is the share button used? Whats the most frequently shared URL across the site?
  • Shared URL history Store the list of URLs a user has shared, to provide a customized and more engaging site.
  • Contextual help The first time a user shares a link back to your site, explain what happened and what they should expect to see next.
  • A/B testing Are many users starting a share action, but failing to finish?

Finally, if you want to fully control the appearance and behavior of the share button (and dont need the callbacks), you can customize the Classroom icon (as long as it still meets our branding guidelines) and initiate the share via a URL of the form:

https://classroom.google.com/share?url=https://foo.com/

As ever, please continue asking questions (or answering them!) on StackOverflow (use the google-classroom tag) and report bugs and feature requests via the Classroom API bug tracker.

Read More..

Building Brillo iant devices with Weave for a Connected world

Posted by Gayathri Rajan & Ryan Cairns

Earlier this year at Google I/O, we previewed Brillo and Weave, our complete solution for building connected devices. Since May, we’ve opened up the Brillo operating system (OS) and Weave communication platform to early access partners. Today, we’re extending this to the broader developer community as part of our invite program. Read on to find out how you can receive an invitation.

Brillo brings the simplicity and speed of software development to hardware by offering you a lightweight embedded OS based on Android, core services, a developer kit, and a developer console. You can choose from a variety of hardware capabilities and customization options, quickly move from prototype to production, and manage at scale with over the air (OTA) updates, metrics, and crash reporting.


Watch this video to learn more about Brillo:


Once you’ve built your connected device, you’ll need to find a way for it to communicate with other devices and allow users to interact with it. That’s where Weave comes in. With Weave, you can build interoperable communications directly into your devices. Weave provides a messaging service that enables phones and devices to talk to each other locally and remotely through the cloud. The Weave cloud server handles remote communication and access to your web-connected device, safely and at scale. With Weave you also get a set of services to securely set up the device and provide controlled access. Additionally, Weave works seamlessly with, and is actually built right into, Brillo; but, you can also use Weave libraries with your existing Linux-based OS.


Check out this video we created to help you understand the power of Weave:


Weave comes with a mobile SDK for both iOS and Android, so that you can build apps to control and enhance the connected device experience for mobile users. If you’re an app developer interested in extending the reach of your apps to the physical world of devices, you can use Weave mobile and web APIs to control multiple Weave devices across brands in a single app.

Both Brillo and Weave are open, extensible, and secure by default to support a variety of devices and use cases. Brillo and Weave provide the platform, tools and services, so you can do what you do best: build great device and app experiences.

In addition to the Brillo and Weave platforms, we’re also unveiling our Weave compatibility program to ship certified Weave-branded devices as well as a hardware program for silicon vendors to build and sell Brillo-compliant hardware.

If you’d like to be part of our developer invite program, visit our website and request an invite. We’ll send you more details as well as access to our code, documentation and developer console. We look forward to making the Internet of Things better, together!

Read More..

Basic WebView


On Android we can build what are called Hybrid Apps. i.e. apps that have both HTML pages as well as native activities co-existing. There is a lot of debate on which is the way to develop for mobiles – HTML5 or native? Each of these have their own pros and cons. I will not go into those now. However, to be able to embed HTML pages into your app, one of the ways is through the use of a WebVew component.
Here I will share with you a very simple example of building a WebViewApp. This is nothing too different from what you see in the google resources pages. However, the intention here is to move from this basic level to a little more advanced level of interacting from the HTML page with Native Apps – integrating through JavaScript. That will be in the next tutorial, in keeping with my principle of explaining one thing at a time.

Also, for this example you will also need to have a webserver that serves you some HTML pages that can be invoked through your WebView. As an addendum to this article, you will find how to create a small web server app in your local environment.

Now, what is a WebView? Google documentation beautifully explains it as
 “A View that displays web pages. This class is the basis upon which you can roll your own web browser or simply display some online content within your Activity. It uses the WebKit rendering engine to display web pages and includes methods to navigate forward and backward through a history, zoom in and out, perform text searches and more.”

Let’s create a WebViewwhich should display your home Page, on loading. In the main class of the project here is the code in the onCreate() method:

  public void onCreate(Bundle savedInstanceState) {
        Log.i(TAG, "Entering onCreate");
        super.onCreate(savedInstanceState);
        setContentView(R.layout.webview);
       
        mWebView = (WebView)findViewById(R.id.webview);
        mWebView.clearCache(true);
        mWebView.getSettings().setJavaScriptEnabled(true);
       mWebView.loadUrl("http://10.0.2.2:8080/SampleWebServer/Welcome.html");
        Log.i(TAG,"Exiting onCreate");
}    

It is simple and straight forward. I have defined a WebViewin the layout folder as below (file name webview.xml)

<LinearLayout >"http://schemas.android.com/apk/res/android"
      android:layout_width="fill_parent"
      android:layout_height="fill_parent">
            <WebView
                android:id="@+id/webview"
                android:layout_width="fill_parent"
                android:layout_height="wrap_content"
                  android:scrollbarStyle="outsideOverlay"
                  android:scrollbarFadeDuration="5"
                  android:fillViewport="true"/>

</LinearLayout>

I get a handle to the WebViewin this line: mWebView = (WebView)findViewById(R.id.webview);
And then I load the local URL in this line       mWebView.loadUrl("http://10.0.2.2:8080/SampleWebServer/Welcome.html");

As simple as this. What this does is that it invokes the default android browser if we have links on the welcome page as shown below: (we have gone out of the WebViewinto a browser app)
 

If we want to be able to continue opening in the WebView, here is the piece of code that would help. Basically we are writing out own custom browser by extending the WebViewClient:

  private classWebViewSampleClient extends WebViewClient{
       
        @Override
        public boolean shouldOverrideUrlLoading(WebView view, String url) {
            view.loadUrl(url);  
           
            return true;
        }
       
  }

Here we are telling to load the passed URL into the WebViewby overriding the shoudlOverrideUrlLoading method of the WebViewClient.

After overriding the same, add another piece of code into onCreate() method:
mWebView.setWebViewClient(new WebViewSampleClient());
after mWebView.loadUrl("http://10.0.2.2:8080/SampleWebServer/Welcome.html");

Now when you click on the Second Page link, the new HTML page gets invoked within the WebViewas shown below:


From here, if you press a back button, you will log out of the app, since WebViewis one activity and the pages are all opened within the WebView. In order to override that behavior and you want to navigate back to the HomePage within the WebView.

    @Override
    public boolean onKeyDown(int keyCode, KeyEvent event) {
        if ((keyCode == KeyEvent.KEYCODE_BACK) && mWebView.canGoBack()) {
            mWebView.goBack();
            return true;
        }
        return super.onKeyDown(keyCode, event);
       
    }

The code is pretty self explanatory. When a back button is clicked and there is something within the WebViewthat we can go back it, do it within the WebView.  Here is the complete code for download.

Last but not the least, I have also added <uses-permission android:name="android.permission.INTERNET" /> into the AndroidManifest file as this app will use the internet to invoke the http based URL.

To create a Web Server and host HTML pages, please see this tutorial.

NOTE: any webserver running locally can be accessed through http protocol using the IP address 127.0.0.1 or localhost or the actual IP address which you get when you run IP address command at the command prompt. However, within the emulator, the linux kernel takes the localhost as 10.0.2.2. and hence you will see in the code above that this IP address is used.


Read More..

Sample Code Download Link

Hi,

I got a lot of requests for alternate download sites (for the Sample Code). So, I have put all the sample code into one page and here is the link to the same. Hope this helps you.

https://sites.google.com/site/saigeethamn/home/android-tutorial-code-for-download
Read More..

California schools inspire students and teachers to keep their “heads in the cloud”


Editors note: California schools are seeing great success with Google for Education. We talked to educators and administrators to reflect on how technology has changed what it means to teach and learn in California. From encouraging strategic thinking to improving writing skills, technology has enhanced the learning experience for students across the state.


For California students, backpacks are getting lighter as schools turn to Chromebooks, Google Apps for Education and cloud-based education apps in place of textbooks, pencils and paper. This new approach to learning is helping students improve their writing and critical thinking skills, while helping teachers and staff increase productivity. Inspired by how schools are innovating with cloud technology across the region, we’re highlighting a few of the successes in California schools:

1. Using the cloud to improve writing quality and creativity 


While writing is predominantly a solitary activity, timely feedback is crucial for helping students to improve their skills. Between 2010 and 2014, the administration at Del Mar Union School District in San Diego introduced Chromebooks and Google Apps for Education to all third through sixth grade classes at all eight schools throughout the district. With these new tools, Del Mar’s staff has seen students’ writing quality dramatically improve. With access to the cloud, students can easily share their assignments with other students and teachers to receive feedback immediately. By storing documents in Google Drive, students can also rest assured that their most recent work is saved and secure.

This new model of classroom collaboration inspires students to experiment and take more risks, knowing that they’ll receive feedback from teachers before getting a final grade.

“Students’ vocabulary has increased. Now they’re using ‘million dollar words’ instead of ‘five dollar words’,” says fourth-grade teacher Stephanie Sullins. “They’re not afraid of making a mistake.”

Chromebooks and Google Apps have also been vital in meeting rigorous Common Core State Standards for writing. “The number of students reaching the top score on the state writing tests dramatically increased after the introduction of Chromebooks,” Sullins says.

2. Using the cloud to create an interactive educational environment


Los Angeles’ KIPP Academy of Opportunity and KIPP LA Prep discovered that the ability to work together, aided by cloud-based tools, pushes students to think more critically. As part of Google’s pilot program that began in spring 2011, the school district introduced 400 Chromebooks — a number that has now grown to 5,000 Chromebooks with hundreds more added each year. KIPP LA decreased their costs by deploying Chromebooks because they no longer needed to purchase expensive software licenses, servers, security solutions, and maintenance plans for each device.

The educational impact for students has been notable. There has been a big shift from direct instruction and memorization of notes to an interactive classroom. Now, students work with one another on projects and share information through Google Hangouts and Google Drive.

“Students create and collaborate, rather than memorize and regurgitate,” said James Sanders, a former social science teacher at KIPP LA Schools. “It’s a better, more authentic model for learning.” As one of Sander’s students explains: “We walk into a social studies class, grab a computer, and check out Mr. Sanders’s blog, then we follow the tasks he sets.”

3. Using the cloud to inspire teachers and students to think outside the box 


The Dublin Unified School District’s teachers and staff needed a better solution for communication and for helping students stay organized. They piloted Google Apps for Education and Google Classroom, and received rave reviews from parents, teachers and students. Now, teachers, students and staff enjoy having one unified platform for email, calendar and document sharing — accessible anytime, from any device.

Technology has become deeply entrenched in Dublin schools. Dublin High School includes among its student body, Hania Guiagoussou, the youngest recipient to-date of Oracle’s Duke’s Choice Award for java programming. At Dublin High School, Guiagoussou was one of the many students who participated in the school’s computer programming class. Now, her first project, WaterSaver, is an award-winning, Java-based system that intelligently controls water sources. Guiagoussou’s story is one of many where technology has inspired a student to reach farther than she ever expected.

Collaboration and sharing in the cloud has made it infinitely easier for schools to exchange information. Using Google Classroom, a student can share writing assignments with a teacher and receive instant feedback. With a few taps, a teacher can share lesson plans or curriculum ideas with her colleague using the Drive mobile app. Administrators know who’s attending the next staff meeting by glancing at a Calendar invite. California schools are doing incredible things by taking a leap toward the cloud.

Check out more inspirational stories from schools.

We’ve heard great stories from many of you about how you’re using technology to do amazing things in your schools, so were going across the U.S. to see for ourselves! Check out the map below to see where we’ve been. We’d love to hear what’s happening in your state, so please share your story on Twitter or Google+ and tag us (@GoogleForEdu) or include the #GoogleEdu hashtag.


Read More..

Episode 41 RecyclerView

In this episode, we recycle our guest list to bring back a former guest, Yigit Boyar, this time to talk about the RecyclerView widget.

Subscribe to the podcast feed or download the audio file directly.

Relevant Links

RecyclerView Animation talk from the Android Dev Summit
Android Application Architecture talk from the Android Dev Summit
Source code for the Android Architecture talk sample app
The new lint check for RecyclerView suggested by Yigit, shipped in 2.0 Preview 5

Yigit Boyar: https://plus.google.com/111851968937104436377, @yigitboyar
Tor: google.com/+TorNorbye, @tornorbye
Chet: google.com/+ChetHaase, @chethaase
Read More..

Getting Started with UDOO

Become an efficient maker by designing and building amazing prototypes with the UDOO platform and Android

Getting Started with UDOO

About This Book
  • Create real-world applications and prototypes using all the features provided by the UDOO board
  • Learn how to use the on-board Android operating system to control circuits and to provide new impressive interactions
  • This is a concise guide with step-by-step instructions that will help you create real-world applications using UDOO
Who This Book Is For
If you are an Android developer who wants to learn how to use UDOO to build Android applications that are capable of interacting with their surrounding environment, then this book is ideal for you. Learning UDOO is the next great step to start building your first real-world prototypes powered by the Android operating system.

What You Will Learn
  • Build working prototype circuits using breadboards
  • Create real-world applications and prototypes using all the features provided by the UDOO board
  • Control external circuits from Android applications with the Accessory Development Kit
  • Listen to the environment and change the application behavior using external sensors
  • Enhance user interaction with native Android APIs for voice recognition and synthesis
  • Use the Android networking API to provide Internet data to UDOO-connected circuits
  • Collect and publish sensor data from Android applications using MQTT libraries
In Detail
UDOO is a new development platform that acts as a single board computer capable of running both Linux and Android operating systems. With the compatibility of Arduino devices together with the Android operating system, this board favors the rapid development of physical applications with a solid user interface, which contributes significantly to the success of your projects.

This book is a great tutorial if you are planning to integrate all the amazing capabilities offered by Android into your small or big prototypes and be productive as soon as possible.

This is a step-by-step tutorial that will help you to create amazing real-world applications using UDOO. In each chapter, a new capability provided by the UDOO board is explained and then used in a real-world context to create a new physical application.

Read More..

Revolution Toolbox

There is something amazing coming for all Android Revolution HD users. But not only. Every Android user would be able to use it!

I will just leave it here... ;)


Hint: Logo


Hint: App drawer icon


Have any questions or comments? Feel free to share! Also, if you like this article, please use media sharing buttons (Twitter, G+, Facebook) down this post!
Read More..

Computer respond to this email Introducing Smart Reply in Inbox by Gmail


(Cross-posted on the Gmail Blog.)

With the holidays approaching and emails coming in at a furious pace, we can all use a little help. Inbox is already on hand assisting you with the next step, organizing your trips, and even suggesting reminders.

But when youre checking email on the go, it can be cumbersome and time-consuming to reply to all or even some of them. What if there was a way for your inbox to guess which emails can be answered with a short reply, prepare a few responses on your behalf and present them to you, one tap away?

Well, starting later this week, Inbox will do just that with Smart Reply.
Smart Reply suggests up to three responses based on the emails you get. For those emails that only need a quick response, it can take care of the thinking and save precious time spent typing. And for those emails that require a bit more thought, it gives you a jump start so you can respond right away.
Theres actually a lot going on behind the scenes to make Smart Reply work. Inbox uses machine learning to recognize emails that need responses and to generate the natural language responses on the fly. If youre interested in how Smart Reply works, including how researchers got machine learning to work on a data set that they never saw, you can read more about it on the Google Research Blog.

And much like how Inbox gets better when you report spam, the responses you choose (or dont choose!) help improve future suggestions. For example, when Smart Reply was tested at Google, a common suggestion in the workplace was "I love you." Thanks to Googler feedback, Smart Reply is now SFW :)

Smart Reply will be rolling out later this week on both Google Play and the App Store in English. If youve got a lot of emails on your plate, nows a great time to try Inbox and get through them faster than ever.


Read More..

Hello World to open photo using Intent ACTION OPEN DOCUMENT with FloatingActionButton and Snackbar

This example work on last post "Updated Android Studio now provide template of Blank Activity with FloatingActionButton and Snackbar", modify the default Hello World to open image with ACTION_OPEN_DOCUMENT,  display on ImageView.


edit layout/activity_main.xml, to modify the icon of the FloatingActionButton, android:src inside <android.support.design.widget.FloatingActionButton>.
<?xml version="1.0" encoding="utf-8"?>
<android.support.design.widget.CoordinatorLayout


android_layout_width="match_parent"
android_layout_height="match_parent" android_fitsSystemWindows="true"
tools_context=".MainActivity">

<android.support.design.widget.AppBarLayout android_layout_height="wrap_content"
android_layout_width="match_parent" android_theme="@style/AppTheme.AppBarOverlay">

<android.support.v7.widget.Toolbar android_id="@+id/toolbar"
android_layout_width="match_parent" android_layout_height="?attr/actionBarSize"
android_background="?attr/colorPrimary" app_popupTheme="@style/AppTheme.PopupOverlay" />

</android.support.design.widget.AppBarLayout>

<include layout="@layout/content_main" />

<android.support.design.widget.FloatingActionButton android_id="@+id/fab"
android_layout_width="wrap_content" android_layout_height="wrap_content"
android_layout_gravity="bottom|end" android_layout_margin="@dimen/fab_margin"
android_src="@android:drawable/ic_menu_gallery" />

</android.support.design.widget.CoordinatorLayout>


layout/content_main.xml, its the main layout of our app.
<?xml version="1.0" encoding="utf-8"?>
<LinearLayout


android_layout_width="match_parent"
android_layout_height="match_parent"
android_padding="16dp"
android_orientation="vertical"
app_layout_behavior="@string/appbar_scrolling_view_behavior"
tools_showIn="@layout/activity_main"
tools_context=".MainActivity">

<TextView
android_layout_width="wrap_content"
android_layout_height="wrap_content"
android_layout_margin="20dp"
android_layout_gravity="center_horizontal"
android_autoLink="web"
android_text="http://android-er.blogspot.com/"
android_textStyle="bold"/>

<ScrollView
android_layout_width="match_parent"
android_layout_height="wrap_content">

<LinearLayout
android_layout_width="match_parent"
android_layout_height="wrap_content"
android_orientation="vertical">

<TextView
android_id="@+id/texturi"
android_layout_width="wrap_content"
android_layout_height="wrap_content" />
<ImageView
android_id="@+id/image"
android_layout_width="wrap_content"
android_layout_height="wrap_content"
android_adjustViewBounds="true"/>

</LinearLayout>
</ScrollView>
</LinearLayout>


com.blogspot.android_er.androidhello.MainActivity.java
package com.blogspot.android_er.androidhello;

import android.annotation.TargetApi;
import android.app.Activity;
import android.content.Intent;
import android.graphics.Bitmap;
import android.graphics.BitmapFactory;
import android.net.Uri;
import android.os.Build;
import android.os.Bundle;
import android.support.design.widget.FloatingActionButton;
import android.support.design.widget.Snackbar;
import android.support.v7.app.AppCompatActivity;
import android.support.v7.widget.Toolbar;
import android.view.View;
import android.view.View.OnClickListener;
import android.widget.ImageView;
import android.widget.TextView;

import java.io.FileNotFoundException;

public class MainActivity extends AppCompatActivity {

private static final int RQS_OPEN_IMAGE = 1;

ImageView imageView;
TextView textUri;

Bitmap bmOriginal = null;
Uri targetUri = null;

@Override
protected void onCreate(Bundle savedInstanceState) {
super.onCreate(savedInstanceState);
setContentView(R.layout.activity_main);
Toolbar toolbar = (Toolbar) findViewById(R.id.toolbar);
setSupportActionBar(toolbar);

FloatingActionButton fab = (FloatingActionButton) findViewById(R.id.fab);
fab.setOnClickListener(new OnClickListener() {
@Override
public void onClick(View view) {
Snackbar.make(view, "Open photo", Snackbar.LENGTH_LONG)
.setAction("OK", snackbarOnClickListener)
.show();
}
});

textUri = (TextView) findViewById(R.id.texturi);
imageView = (ImageView) findViewById(R.id.image);
}

OnClickListener snackbarOnClickListener = new OnClickListener(){
@Override
public void onClick(View v) {

bmOriginal = null;
imageView.setImageBitmap(null);

Intent intent = new Intent();

if (Build.VERSION.SDK_INT >=
Build.VERSION_CODES.KITKAT) {
intent.setAction(Intent.ACTION_OPEN_DOCUMENT);
} else {
intent.setAction(Intent.ACTION_GET_CONTENT);
}

intent.addCategory(Intent.CATEGORY_OPENABLE);

// set MIME type for image
intent.setType("image/*");

startActivityForResult(intent, RQS_OPEN_IMAGE);

}
};

@TargetApi(Build.VERSION_CODES.KITKAT)
@Override
protected void onActivityResult(int requestCode,
int resultCode, Intent data) {

if (resultCode == Activity.RESULT_OK) {

Uri dataUri = data.getData();

if (requestCode == RQS_OPEN_IMAGE) {
targetUri = dataUri;
textUri.setText(dataUri.toString());
updatImage(dataUri);
}
}

}

private void updatImage(Uri uri){

if (uri != null){
Bitmap bm;
try {
bm = BitmapFactory.decodeStream(
getContentResolver()
.openInputStream(uri));
imageView.setImageBitmap(bm);
bmOriginal = bm;

} catch (FileNotFoundException e) {
// TODO Auto-generated catch block
e.printStackTrace();
}
}
}

}


download filesDownload the files (Android Studio Format) .

Related:
- Using Intent.ACTION_OPEN_DOCUMENT, for KitKat API 19 or higher

Next:
- Apply photo effects using Media Effects APIs

Read More..

Blog Archive

Powered by Blogger.